Woodworker's Journal 2004 Summer, страница 69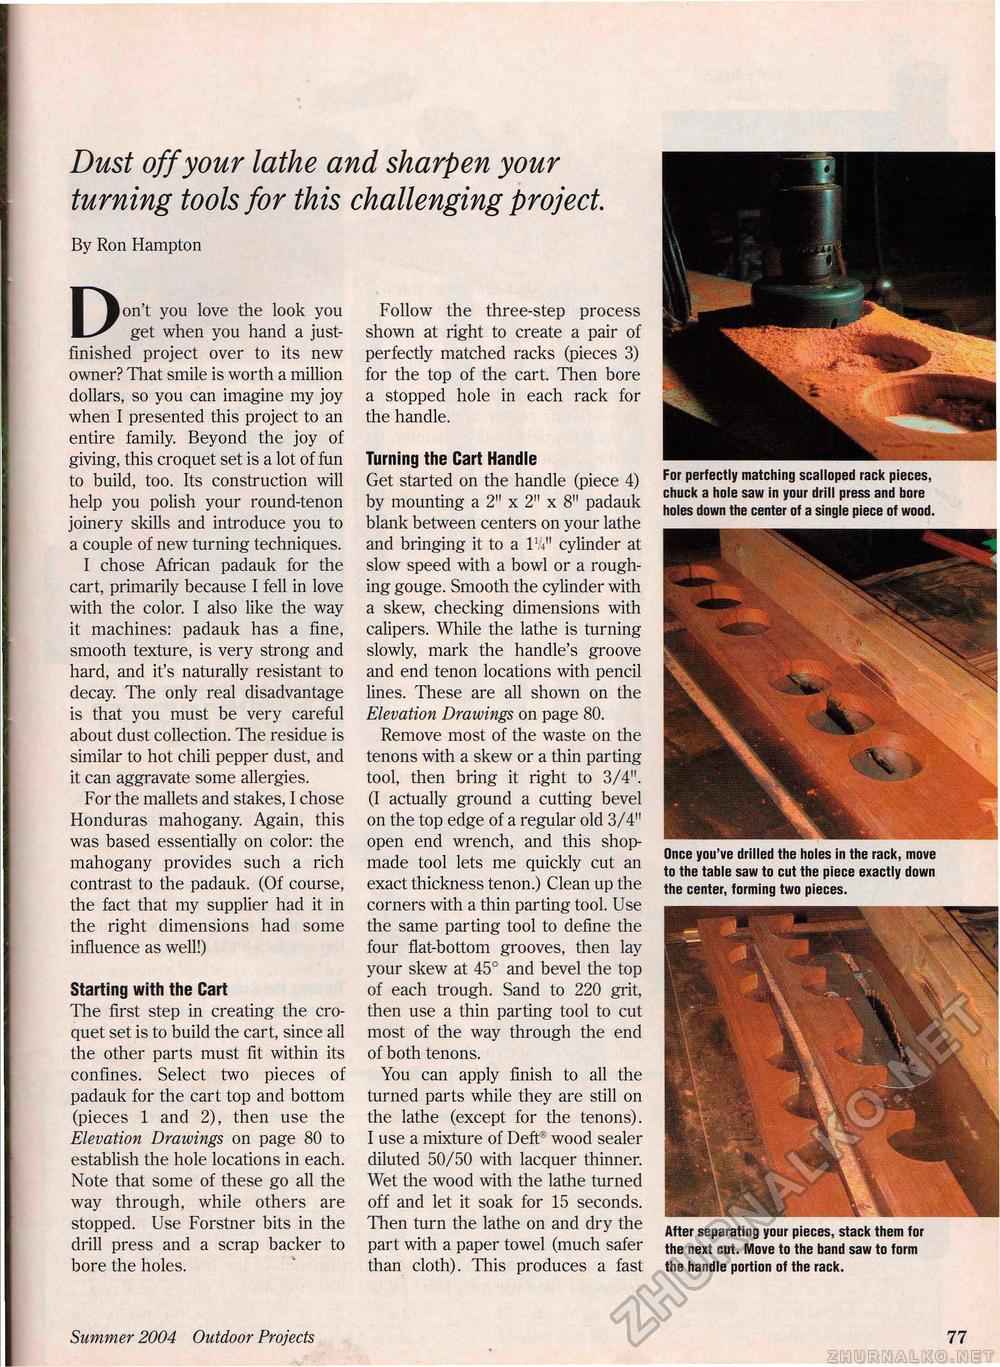
Dust off your lathe and sharpen your turning tools for this challenging project. By Ron Hampton Don't you love the look you get when you hand a just-finished project over to its new owner? That smile is worth a million dollars, so you can imagine my joy when I presented this project to an entire family Beyond the joy of giving, this croquet set is a lot of fun to build, too. Its construction will help you polish your round-tenon joinery skills and introduce you to a couple of new turning techniques. I chose African padauk for the cart, primarily because I fell in love with the color. I also like the way it machines: padauk has a fine, smooth texture, is very strong and hard, and it's naturally resistant to decay. The only real disadvantage is that you must be very careful about dust collection. The residue is similar to hot chili pepper dust, and it can aggravate some allergies. For the mallets and stakes, I chose Honduras mahogany. Again, this was based essentially on color: the mahogany provides such a rich contrast to the padauk. (Of course, the fact that my supplier had it in the right dimensions had some influence as well!) Starting with the Cart The first step in creating the croquet set is to build the cart, since all the other parts must fit within its confines. Select two pieces of padauk for the cart top and bottom (pieces 1 and 2), then use the Elevation Drawings on page 80 to establish the hole locations in each. Note that some of these go all the way through, while others are stopped. Use Forstner bits in the drill press and a scrap backer to bore the holes. Follow the three-step process shown at right to create a pair of perfectly matched racks (pieces 3) for the top of the cart. Then bore a stopped hole in each rack for the handle. Turning the Cart Handle Get started on the handle (piece 4) by mounting a 2" x 2" x 8" padauk blank between centers on your lathe and bringing it to a PA" cylinder at slow speed with a bowl or a roughing gouge. Smooth the cylinder with a skew, checking dimensions with calipers. While the lathe is turning slowly, mark the handle's groove and end tenon locations with pencil lines. These are all shown on the Elevation Drawings on page 80. Remove most of the waste on the tenons with a skew or a thin parting tool, then bring it right to 3/4". (I actually ground a cutting bevel on the top edge of a regular old 3/4" open end wrench, and this shop-made tool lets me quickly cut an exact thickness tenon.) Clean up the corners with a thin parting tool. Use the same parting tool to define the four flat-bottom grooves, then lay your skew at 45° and bevel the top of each trough. Sand to 220 grit, then use a thin parting tool to cut most of the way through the end of both tenons. You can apply finish to all the turned parts while they are still on the lathe (except for the tenons). I use a mixture of Deft® wood sealer diluted 50/50 with lacquer thinner. Wet the wood with the lathe turned off and let it soak for 15 seconds. Then turn the lathe on and dry the part with a paper towel (much safer than cloth). This produces a fast After separating your pieces, stack them for the next cut. Move to the band saw to form the handle portion of the rack. Once you've drilled the holes in the rack, move to the table saw to cut the piece exactly down the center, forming two pieces. For perfectly matching scalloped rack pieces, chuck a hole saw in your drill press and bore holes down the center of a single piece of wood. Summer 2004 Outdoor Projects 77 |


